Healthy Apple Nachos – Easy Kid Snack
Healthy Apple Nachos: a vibrant and delicious snack that’s about to become your go-to for happy little eaters! Forget the greasy chips and sugary dips, because these healthy apple nachos are here to revolutionize snack time. Imagine crisp apple slices, artfully arranged, then drizzled with creamy, wholesome toppings. It’s a symphony of textures and flavors that kids (and honestly, adults too!) can’t get enough of. What makes this dish so special? It’s incredibly versatile and allows for endless creativity, making it a fun activity for the whole family to assemble. We’re talking about transforming a simple fruit into a craveable treat that’s packed with nutrients, without sacrificing any of the fun. Get ready to discover your new favorite healthy snack that will have everyone asking for seconds!

Healthy Apple Nachos – Healthy Snack for Kids
Looking for a fun, healthy, and delicious snack that your kids will actually ask for? You’ve come to the right place! These Healthy Apple Nachos are a fantastic way to get some fruit into your little ones while satisfying their sweet cravings. Forget the greasy chips and sugary dips; this recipe transforms simple apples into a vibrant and customizable treat that’s perfect for after-school, a weekend surprise, or even a playful dessert. It’s so easy to assemble, and the creativity your kids can bring to decorating them makes it an activity in itself!
These apple nachos are wonderfully versatile. You can adjust the toppings based on what you have in your pantry or your children’s preferences. The base of crisp apples provides a satisfying crunch, while the melted toppings add a delightful creaminess and sweetness. Plus, it’s a snack that feels indulgent but is packed with nutrients. Apples are a great source of fiber and vitamins, and by choosing wholesome toppings, you’re giving your kids a snack that’s both good for them and incredibly tasty. Let’s get started on creating this delightful treat!
Ingredients:
- 5 apples (Gala, Honeycrisp or Fuji recommended)
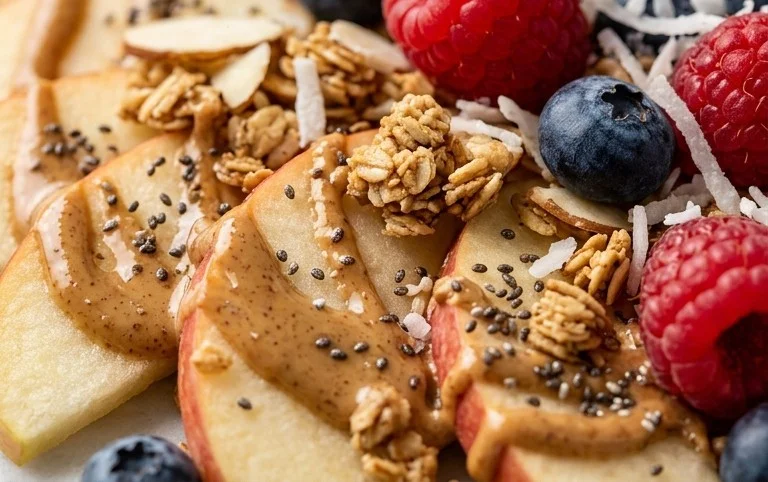
- 2 tbsp peanut butter (almond butter or nut butter of your choice)
- 1/4 cup dairy free chocolate chips
- Optional toppings: a sprinkle of shredded coconut, a few chopped nuts (if age-appropriate and no allergies), a drizzle of honey or maple syrup, a sprinkle of cinnamon.
Preparing the Apples: The Foundation of Flavor
The first step in creating our delicious apple nachos is to prepare the apples. The type of apple you choose can really influence the overall taste and texture. Gala apples offer a sweet and mild flavor, Honeycrisp apples provide a delightful crispness with a honey-like sweetness, and Fuji apples are known for their balanced sweet-tart taste and firm texture. Whichever you choose, make sure they are fresh and firm for the best nacho experience.
Carefully wash all five apples under cool running water. We want to ensure they are clean and free from any dirt or residue. Next, we’ll core the apples. You can use an apple corer for this, which is a quick and efficient tool. If you don’t have a corer, you can simply cut the apples into quarters and then use a small knife to cut out the core from each quarter. This step is important because the core isn’t pleasant to eat and can contain seeds.
Once the apples are cored, it’s time to slice them. The goal is to create slices that are thin enough to be easily handled by little hands and to resemble the shape of nacho chips. Aim for slices that are about ¼ inch thick. If you find the slices are too thick, they might be difficult to arrange and top. If they are too thin, they might become soggy too quickly. A good balance is key! As you slice each apple, place the slices onto a plate or baking sheet. To prevent the apples from browning, which can happen quite quickly due to oxidation, you can toss them gently with a little bit of lemon juice (about 1 teaspoon for all the apples). This natural acidity works wonders to keep them looking fresh and appealing.
Melting the Toppings: The Drizzly Delights
Now, let’s move on to the delicious drizzles that will transform our apple slices into true nachos! We have two main components here: the peanut butter and the dairy-free chocolate chips.
First, let’s prepare the peanut butter. Take your 2 tablespoons of peanut butter (or almond butter, or your favorite nut butter) and place it in a small microwave-safe bowl. If your nut butter is very stiff or separated, you might want to stir it well before microwaving. Microwave the peanut butter in short bursts, about 15-20 seconds at a time, stirring in between each interval. You want to achieve a smooth, pourable consistency. Be careful not to overheat it, as it can become too runny or even burn. The goal is a consistency that you can easily drizzle over the apple slices. If you don’t have a microwave, you can gently warm it in a small saucepan over low heat on the stovetop, stirring constantly, until it reaches your desired drizzling consistency.
Next, we’ll prepare the dairy-free chocolate chips. Take your ¼ cup of dairy-free chocolate chips and place them in a separate, clean microwave-safe bowl. Similar to the peanut butter, microwave these in 15-20 second intervals, stirring well after each interval. Dairy-free chocolate chips can sometimes be a little trickier to melt smoothly, so a gentle hand and patient stirring are essential. You’re aiming for a rich, glossy melted chocolate that can be easily drizzled. If you prefer, you can also melt the chocolate using a double boiler method on the stovetop for more control. Once both the peanut butter and chocolate are melted and smooth, they are ready to adorn our apple nachos.
Assembling the Apple Nachos: The Fun Part!
This is where the magic happens and where your little chefs can really get involved! Take the prepared apple slices and arrange them on a serving plate or a platter. You can overlap them slightly to create a visually appealing base for your toppings. Think of it like creating a bed of delicious apple chips!
Once your apple slices are artfully arranged, it’s time to drizzle! Take your now-melted peanut butter and, using a spoon or a small piping bag (you can make a makeshift one by snipping a corner off a zip-top bag), drizzle it generously over the apple slices. Try to create a nice zig-zag pattern to distribute the flavor evenly.
Next, do the same with your melted dairy-free chocolate. Drizzle the chocolate over the apple slices, alternating with or layering on top of the peanut butter. The contrasting colors of the peanut butter and chocolate will make these apple nachos look incredibly appealing. Don’t be afraid to be generous; more is usually merrier when it comes to delicious toppings!
Adding Extra Flair: The Optional Toppings
Now for the truly fun and customizable part – adding those extra special touches! This is where you can let your creativity (and your kids’ imaginations) run wild. Consider adding a sprinkle of shredded coconut for a tropical twist and a hint of texture. If your children are older and you know there are no nut allergies, a small sprinkle of finely chopped nuts can add a delightful crunch and extra protein.
For a touch more sweetness, a light drizzle of honey or maple syrup over the top can be lovely. And who can resist a sprinkle of cinnamon? It pairs beautifully with apples and adds a warm, comforting aroma and flavor. You can also experiment with other fun toppings like mini marshmallows (check for gelatin if you need them to be strictly vegetarian), a dusting of cocoa powder, or even some colorful sprinkles if you’re feeling festive. The possibilities are truly endless, and the best part is that your kids can choose their favorites!
Once all the toppings are added, you can either serve them immediately for the best crispness of the apples, or if you want them to be slightly chilled and for the toppings to set a bit more, you can pop them in the refrigerator for about 10-15 minutes. However, I find they are most enjoyable when the apples are still wonderfully crisp. Enjoy your healthy and delicious apple nachos!
Conclusion:
So there you have it – a truly delicious and incredibly healthy apple nachos recipe perfect for your little ones! This snack is a winner because it transforms simple fruit into an exciting and fun treat that kids will adore. It’s a fantastic way to sneak in some extra nutrients while satisfying those sweet cravings. The crisp apple slices, creamy yogurt, and crunchy toppings create a delightful texture and flavor combination that’s hard to resist. We love how customizable these healthy apple nachos are, making them suitable for picky eaters and adventurous palates alike.
Don’t be afraid to get creative with your toppings! Think a sprinkle of granola for extra crunch, a drizzle of nut butter for healthy fats, or even some shredded coconut for a tropical twist. They make a wonderful after-school snack, a fun addition to a lunchbox, or even a healthier dessert option. We wholeheartedly encourage you to give this recipe a try. It’s so easy to make, requires minimal cleanup, and the smiles you’ll get are absolutely worth it. Enjoy this delightful and healthy apple nachos creation!
Frequently Asked Questions:
Can I make this recipe ahead of time?
While you can slice the apples and prepare the toppings in advance, it’s best to assemble the apple nachos right before serving. This ensures the apples stay crisp and the toppings don’t make them soggy.
What are some good dairy-free options for the yogurt?
Absolutely! You can easily use a dairy-free yogurt alternative such as coconut yogurt, almond yogurt, or soy yogurt. They will provide a similar creamy base for your healthy apple nachos.
Are there any nut-free variations?
Yes, for a nut-free version, simply omit any nut butters or toppings containing nuts. You can substitute with sunflower seed butter or enjoy them with seeds like pumpkin seeds or chia seeds for added texture and nutrients.
Healthy Apple Nachos – Healthy Snack for Kids
A fun and healthy snack for kids, featuring crisp apple slices topped with peanut butter and chocolate.
Ingredients
-
5 apples (Gala, Honeycrisp or Fuji recommended)
-
2 tbsp peanut butter
-
1/4 cup dairy free chocolate chips
-
1 tbsp chia seeds
-
1 tbsp shredded coconut
-
1 tsp cinnamon
Instructions
-
Step 1
Wash and core the apples. -
Step 2
Slice the apples into thin wedges or rounds. -
Step 3
Arrange the apple slices on a plate or serving platter. -
Step 4
Warm the peanut butter slightly if needed to make it drizzly. Drizzle the peanut butter over the apple slices. -
Step 5
Sprinkle the dairy free chocolate chips over the apple slices. -
Step 6
Garnish with chia seeds, shredded coconut, and cinnamon. -
Step 7
Serve immediately and enjoy!
Important Information
Nutrition Facts (Per Serving)
It is important to consider this information as approximate and not to use it as definitive health advice.
Allergy Information
Please check ingredients for potential allergens and consult a health professional if in doubt.