Easy Homemade Fruit Leather – Pure Fruit Goodness
Homemade fruit leather recipe. Are you ready to recapture a taste of childhood and unleash your inner kitchen alchemist? There’s something undeniably magical about fruit leather – that chewy, intensely fruity, and wonderfully portable treat that was a staple of lunchboxes and afternoon snacks for so many of us. But beyond the nostalgic appeal, what truly makes homemade fruit leather so special is its incredible versatility and the sheer joy of creating something so vibrant and delicious from scratch. Forget those store-bought versions packed with artificial colors and flavors; when you make your own fruit leather, you control every single ingredient. This simple, yet profoundly satisfying, homemade fruit leather recipe allows you to capture the pure essence of your favorite fruits, creating a healthy and delightful snack that’s perfect for kids and adults alike. Get ready to transform fresh fruit into a delightful, naturally sweet sensation!
Homemade Fruit Leather Recipe
There’s something incredibly satisfying about making your own fruit leather. It’s a taste of pure, concentrated fruit goodness, free from the artificial flavors and excessive sugars often found in store-bought versions. Plus, it’s a fantastic way to use up ripe produce before it goes bad. My family absolutely loves it, and it’s become a staple for school lunches and after-school snacks. It’s surprisingly simple to make, requiring just a few basic ingredients and a little patience. Let’s dive into how you can create this delightful treat at home.
Ingredients:
- 2 cups fruit, chopped (your choice!)
- 3 tbsp white sugar (adjust to your sweetness preference)
- ½ whole lemon, just the juice
Choosing Your Fruit
The beauty of fruit leather is its versatility. You can use almost any fruit you like! Berries are a fantastic choice – strawberries, raspberries, blueberries, and blackberries all lend themselves beautifully to fruit leather, offering vibrant colors and intense flavors. Stone fruits like peaches, nectarines, and plums also work wonderfully, though you might want to remove the skins for a smoother texture. Apples and pears are classic choices, and you can even combine different fruits for a unique flavor profile. For this recipe, I’m using a mix of ripe strawberries and raspberries. Ensure your fruit is ripe; this will give you the best flavor and natural sweetness, potentially allowing you to reduce the added sugar. When chopping, aim for roughly uniform pieces so they cook down evenly.
Equipment You’ll Need
Beyond the ingredients, you’ll need a few simple kitchen tools. A blender or food processor is essential for pureeing the fruit. A saucepan for cooking down the fruit mixture, and a baking sheet lined with parchment paper or a silicone baking mat are crucial for dehydrating. A spatula will be helpful for spreading the mixture evenly.
Cooking Instructions
Here’s how we’ll transform simple fruit into delicious fruit leather:
1. Prepare the Fruit Puree: In your blender or food processor, combine the 2 cups of chopped fruit. Add the 3 tablespoons of white sugar and the juice of half a lemon. The lemon juice is a key ingredient; it not only adds a bright, tangy counterpoint to the sweetness but also helps to preserve the vibrant color of the fruit and acts as a natural pectin, aiding in the setting process of the leather. Pulse and blend until you achieve a very smooth puree. There shouldn’t be any large chunks of fruit remaining. If you’re using fruits like apples or pears that might have a slightly tougher texture, you might want to steam them slightly before pureeing to ensure a completely smooth consistency. Taste the puree at this stage and adjust the sugar if you prefer it sweeter or more tart.
2. Cook Down the Mixture: Pour the fruit puree into a medium saucepan. Place the saucepan over medium heat. Stir the mixture constantly to prevent it from sticking to the bottom and burning. We want to cook down the fruit to reduce the moisture content. As it heats, you’ll notice the mixture will start to thicken. This process can take anywhere from 10 to 20 minutes, depending on the water content of your fruit. Continue stirring until the puree has thickened considerably and coats the back of a spoon. It should have a consistency similar to applesauce, but a little thicker. This cooking step is vital; it concentrates the fruit flavor and removes excess water, which is essential for the fruit leather to dry properly and not become sticky or moldy.
3. Spread and Prepare for Drying: Preheat your oven to its lowest possible setting, typically around 170-200°F (75-95°C). While the oven is preheating, carefully pour the thickened fruit puree onto your prepared baking sheet (lined with parchment paper or a silicone mat). Using your spatula, spread the mixture as thinly and evenly as possible. A thickness of about 1/8 to 1/4 inch is ideal. The thinner you spread it, the faster it will dry, but be careful not to make it too thin, or it might become brittle. Try to get the edges as uniform as the center. This even thickness is critical for uniform drying. If some areas are much thicker than others, those spots will remain sticky while the thinner areas become over-dried.
4. The Drying Process: Carefully place the baking sheet into the preheated oven. Now comes the patience! You will need to let the fruit leather dry for several hours. The exact time will vary depending on your oven’s temperature, the thickness of your fruit leather, and the humidity in your kitchen. It can take anywhere from 4 to 8 hours, sometimes even longer. To help the drying process and prevent condensation from making the leather sticky, you can slightly prop open the oven door with a wooden spoon or a heat-resistant utensil. This allows moisture to escape. Check on the fruit leather periodically. You’re looking for a texture that is no longer wet or sticky to the touch. It should feel leathery and slightly pliable, but not brittle. It will continue to firm up as it cools.
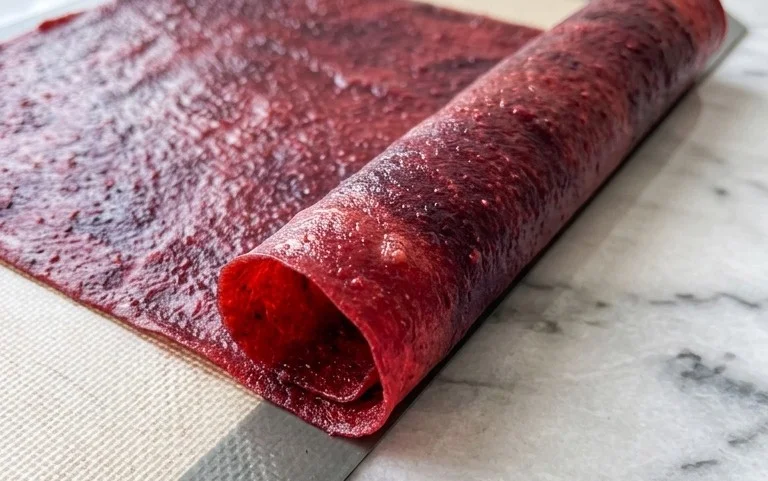
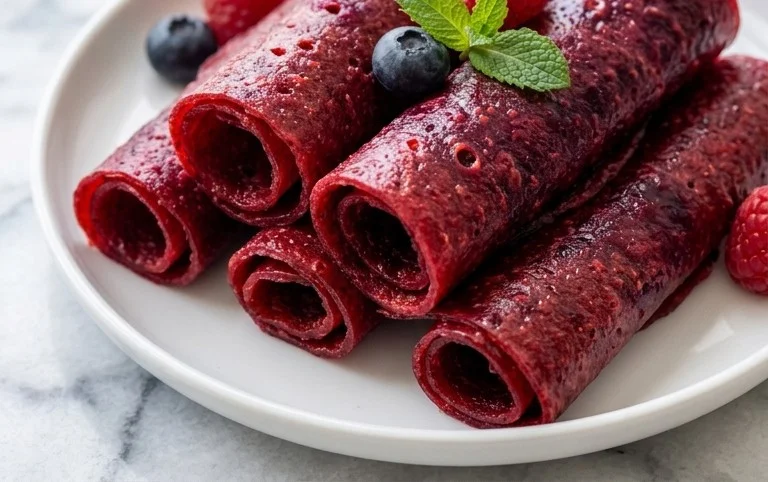
5. Cooling and Cutting: Once the fruit leather appears dry and leathery, carefully remove the baking sheet from the oven. Let it cool completely on the baking sheet. This cooling period is also important for the texture to fully set. Once cooled, you can peel the fruit leather off the parchment paper or silicone mat. Now comes the fun part: cutting! You can cut it into strips, squares, or even use cookie cutters for fun shapes. Roll up the strips for easy storage and a classic fruit leather presentation.
Storing Your Homemade Fruit Leather
Store your finished fruit leather in an airtight container at room temperature for up to a week, or in the refrigerator for longer storage. If you live in a humid climate, it’s best to store it in the refrigerator to prevent it from becoming sticky. Enjoy your delicious, homemade fruit leather!
Conclusion:
Making your own fruit leather is such a rewarding and delicious endeavor! This homemade fruit leather recipe is fantastic because it’s incredibly versatile, allowing you to use your favorite fruits or even what’s in season. It’s a healthy and fun alternative to store-bought snacks, free from artificial ingredients and packed with natural sweetness. The process, while requiring some patience, is surprisingly simple and results in a chewy, intensely flavored treat that kids and adults alike will adore.
I love serving fruit leather in bite-sized strips for lunchboxes, after-school snacks, or even as a unique dessert accompaniment. Imagine pairing a berry fruit leather with vanilla yogurt or a stone fruit leather with a cheese platter! The possibilities for variations are endless. Feel free to experiment with different fruit combinations, add a pinch of cinnamon or ginger for extra warmth, or even swirl in a tablespoon of nut butter before dehydrating for a richer flavor profile.
Don’t be intimidated by the dehydrating process – it’s quite straightforward. I truly encourage you to give this homemade fruit leather recipe a try. It’s a wonderful way to preserve fresh fruit and create a delightful, wholesome snack that you can feel good about sharing. Happy fruit leathermaking!
Frequently Asked Questions:
Can I use frozen fruit for this recipe?
Absolutely! Frozen fruit works perfectly well for making fruit leather. Thaw it completely and drain off any excess liquid before pureeing. This is a great way to use up fruit that might be nearing its expiration date.
What’s the best way to store homemade fruit leather?
Once completely cooled and cut into portions, store your fruit leather wrapped tightly in plastic wrap or parchment paper, then placed in an airtight container. It can be kept at room temperature for a few days, or in the refrigerator for several weeks to maintain its chewiness and prevent it from drying out too much.
How long does the fruit leather need to dehydrate?
The dehydration time can vary significantly depending on your dehydrator’s settings, the thickness of your fruit layer, and the humidity in your home. Typically, it can take anywhere from 6 to 12 hours, or even longer. You’re looking for the fruit leather to be firm to the touch and no longer sticky, with a slightly chewy texture.
Homemade Fruit Leather
Easy and delicious fruit leather made with fresh fruit, sugar, and lemon juice. A healthy and fun snack.
Ingredients
-
2 cups fruit, chopped
-
3 tbsp white sugar
-
½ whole lemon, just the juice
-
1 cup water
-
½ tsp vanilla extract
-
1 pinch salt
Instructions
-
Step 1
Prepare your fruit: wash, chop, and remove any seeds or cores. If using frozen fruit, thaw and drain any excess liquid. -
Step 2
Cook the fruit: In a saucepan, combine the chopped fruit, white sugar, and lemon juice. Add 1 cup of water. -
Step 3
Simmer the fruit mixture over medium heat until the fruit breaks down and the mixture thickens, about 15-20 minutes. Stir occasionally. -
Step 4
Puree the mixture: Carefully transfer the cooked fruit mixture to a blender or food processor. Add vanilla extract and a pinch of salt. Blend until smooth. -
Step 5
Prepare for drying: Line a baking sheet with parchment paper or a silicone baking mat. Pour the fruit puree onto the prepared sheet, spreading it evenly to about ¼ inch thickness. -
Step 6
Bake at the lowest oven setting (around 170°F or 75°C) for 4-6 hours, or until the fruit leather is no longer sticky to the touch and peels away easily from the parchment paper. Drying time may vary depending on your oven and fruit thickness. -
Step 7
Cool and cut: Let the fruit leather cool completely on the baking sheet. Once cooled, carefully peel it off and cut into desired strips or shapes using a knife or pizza cutter.
Important Information
Nutrition Facts (Per Serving)
It is important to consider this information as approximate and not to use it as definitive health advice.
Allergy Information
Please check ingredients for potential allergens and consult a health professional if in doubt.