Easy Rice Krispie Treat Pumpkins Recipe Fun
Rice Krispie Treat Pumpkins are undeniably one of the most charming and delightful ways to embrace the fall season. Who can resist the nostalgic crunch and sweet chewiness of a classic Rice Krispie treat? We sure can’t! This year, we’re taking that beloved confection and transforming it into adorable, edible pumpkins, perfect for Halloween parties, Thanksgiving gatherings, or simply a fun afternoon activity with the kids. What makes these Rice Krispie Treat Pumpkins so special? It’s the simple magic of a few basic ingredients coming together to create something truly festive and utterly delicious. They’re surprisingly easy to make, making them a stress-free addition to your holiday baking repertoire. Get ready to impress your loved ones with these sweet, perfectly orange, and undeniably delightful treats!
Why You’ll Love Making These
Nostalgia with a Twist
There’s something incredibly comforting about Rice Krispie treats. They bring us back to childhood, to simpler times. Now, imagine that comforting taste shaped into a cheerful pumpkin – it’s pure joy!
Effortlessly Festive
Forget complicated frosting or intricate decorating. These Rice Krispie Treat Pumpkins achieve their festive look with minimal effort, making them accessible for bakers of all skill levels.
Guaranteed Crowd-Pleaser
From toddlers to adults, everyone has a soft spot for a good Rice Krispie treat. These pumpkin-shaped versions are a guaranteed hit, adding a playful touch to any occasion.

Rice Krispie Treat Pumpkins
Get ready to add a festive and delicious touch to your Halloween celebrations with these adorable Rice Krispie Treat Pumpkins! These iconic treats are always a crowd-pleaser, and with a few simple additions, we can transform them into the perfect seasonal centerpiece. They’re wonderfully easy to make, making them a fantastic activity for kids and adults alike. The slightly chewy, sweet interior combined with the fun pumpkin shape and candy decorations makes these a truly delightful Halloween snack. Plus, who can resist a homemade treat that looks as good as it tastes? Let’s get started on crafting these cheerful little pumpkins!
Ingredients:
- 1/4 cup Butter
- 1 bag large marshmallows (approximately 40 marshmallows)
- 6 cups Rice Krispies
- Red & Yellow Liquid Food Coloring
- Mini Rolos
- Green M&M’s
- 1/4 cup cooking oil or melted butter in a small bowl (to keep it from sticking to your hands)
Crafting Your Pumpkin Treats
The magic of these Rice Krispie Treat Pumpkins begins with the classic foundation of a Rice Krispie treat. We’ll be using a simple, time-tested method to create the perfect base before we get creative with our pumpkin transformation. The key is to get a good, even melt on the marshmallows and to mix thoroughly for that signature crispy texture.
1. **Melt the Foundation:** In a large pot or Dutch oven, melt the 1/4 cup of butter over low heat. Once the butter is completely melted and just starting to shimmer, add the bag of large marshmallows. Stir constantly, keeping the heat low to prevent the marshmallows from scorching or browning. Continue stirring until the marshmallows are completely melted and smooth. This is the crucial step for achieving that wonderfully sticky and cohesive Rice Krispie treat base. You want a gooey, uniform mass before adding the cereal. Don’t rush this part; patience ensures a better final product.
2. **Introduce the Cereal and Color:** Once the marshmallows are smoothly melted, remove the pot from the heat. Gradually add the 6 cups of Rice Krispies cereal to the melted marshmallow mixture. Stir gently but thoroughly until all the cereal is coated. This is where the color comes in! Add a few drops of yellow food coloring and a drop or two of red food coloring. Stir until you achieve a vibrant orange hue. The exact amount of food coloring will depend on the brand and how concentrated the colors are, so start with a little and add more as needed to get that perfect pumpkin shade. Remember, you’re aiming for a rich, warm orange. Ensure the color is evenly distributed throughout the mixture for a uniform look.
3. **Shape Your Pumpkins:** Now for the fun part! Lightly grease your hands with the 1/4 cup of cooking oil or melted butter in the small bowl. This is essential to prevent the sticky Rice Krispie mixture from clinging to your hands, making shaping much easier. Scoop out portions of the orange Rice Krispie mixture, about the size of a golf ball or slightly larger, depending on your desired pumpkin size. Gently roll and shape each portion into a slightly flattened ball, mimicking the rounded shape of a pumpkin. Don’t aim for perfectly round; a slightly imperfect, natural pumpkin shape is even better. Work quickly, as the mixture will begin to set.
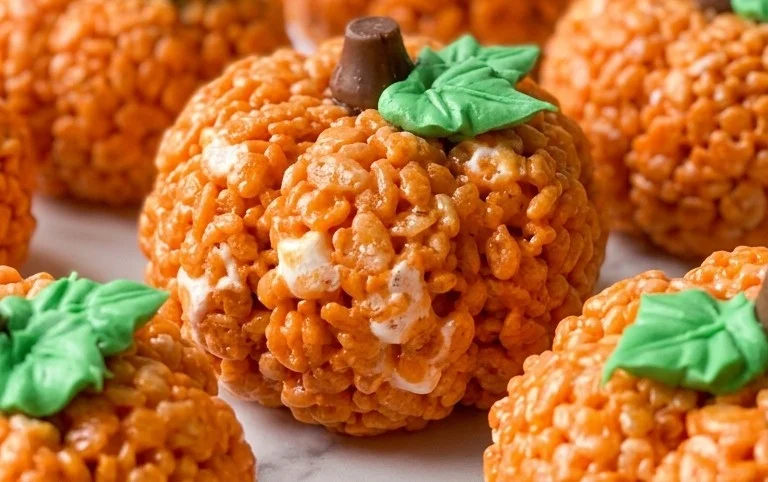
4. **Add the Stems and Details:** Once you have your pumpkin shapes formed, it’s time to add the finishing touches that make them truly pumpkin-like. For the stems, take a mini Rolo candy and gently press one end into the top center of each pumpkin shape. The Rolo will stand upright, creating a realistic pumpkin stem. For the texture, you can use a knife or a toothpick to gently score lines radiating from the stem down the sides of the pumpkin, giving it that characteristic ribbed appearance. Be gentle so you don’t distort the shape too much.
5. **Vine Details and Final Touches:** To add a touch of greenery and complete the pumpkin illusion, place one or two green M&M’s near the stem, as if they are little leaves or vine tendrils. You can gently press them into the warm Rice Krispie treat so they adhere well. Allow the Rice Krispie Treat Pumpkins to cool and set completely on a parchment-lined baking sheet or wax paper. Once they are firm, they are ready to be displayed and enjoyed! These are best served at room temperature for optimal texture. You can store any leftovers in an airtight container at room temperature for a few days.
These Rice Krispie Treat Pumpkins are not only a treat for your taste buds but also a delightful decoration for your Halloween party table. They’re simple enough for little hands to help with the shaping and decorating, making them a fantastic family activity. Enjoy the process and the delicious results! Happy Halloween!
Conclusion:
And there you have it! These delightful Rice Krispie Treat Pumpkins are the perfect way to inject some festive fun into your autumn celebrations. What makes this recipe truly special is its incredible simplicity and the boundless joy it brings. You can whip up a batch in no time, making it an ideal activity for kids and adults alike to enjoy together. They’re not just a treat; they’re a heartwarming activity that creates lasting memories. Their slightly chewy, perfectly sweet texture, combined with their adorable pumpkin shape, makes them a guaranteed hit at any fall gathering, from classroom parties to Thanksgiving dessert tables.
Serving these little gourds is a breeze! They stand beautifully on their own, but you can elevate them further by placing them on a bed of green candy leaves or adding a small sprig of green frosting for a vine. For variations, don’t be afraid to experiment! Consider adding a touch of orange zest to the mixture for an extra citrusy kick, or perhaps a swirl of white chocolate drizzle for a touch of decadence. You could even add a few mini chocolate chips for ‘seeds’ inside the pumpkin.
I truly encourage you to give these Rice Krispie Treat Pumpkins a try. They are a low-stress, high-reward recipe that promises smiles all around. Get creative, have fun, and embrace the spirit of the season with this wonderfully easy and festive treat.
Frequently Asked Questions:
Q: How long do these Rice Krispie Treat Pumpkins stay fresh?
A: When stored properly in an airtight container at room temperature, they should stay fresh and delicious for up to 3-4 days. Avoid refrigerating, as this can make them hard.
Q: Can I make these treats ahead of time for a party?
A: Absolutely! You can prepare the pumpkin shapes the day before your event. Just ensure they are well-wrapped to maintain their freshness.
Q: What kind of orange coloring should I use?
A: Gel food coloring is generally recommended for the most vibrant and consistent orange hue without altering the texture of the treats. Start with a small amount and add more until you achieve your desired color.
Rice Krispie Treat Pumpkins
A fun and festive Halloween treat made from classic Rice Krispie squares, shaped and decorated like mini pumpkins. Perfect for parties or a spooky snack!
Ingredients
-
1/4 cup Butter
-
1 bag large marshmallows (approximately 40 marshmallows)
-
6 cups Rice Krispies
-
Red & Yellow Liquid Food Coloring
-
Mini Rolos
-
Green M&M’s
-
1/4 cup cooking oil or melted butter in a small bowl
Instructions
-
Step 1
Melt the butter in a large pot over low heat. Add the marshmallows and stir until completely melted and smooth. -
Step 2
Remove from heat. Stir in the Rice Krispies cereal until well coated. -
Step 3
While the mixture is still warm, add drops of red and yellow food coloring, mixing gently until you achieve a pumpkin-orange color. Be careful not to overmix, which can make the treats tough. -
Step 4
Lightly grease your hands with cooking oil or melted butter. Take about 1/2 cup of the Rice Krispie mixture and shape it into a pumpkin form. Repeat with the remaining mixture. -
Step 5
Gently press a Mini Rolo into the top center of each pumpkin shape to create the stem. You may need to trim the Rolo slightly if it’s too large. -
Step 6
Place a Green M&M at the base of the Rolo stem to resemble a leaf. Let the pumpkins cool and set completely before serving.
Important Information
Nutrition Facts (Per Serving)
It is important to consider this information as approximate and not to use it as definitive health advice.
Allergy Information
Please check ingredients for potential allergens and consult a health professional if in doubt.