Quick Pickled Banana Peppers-Easy Zesty Recipe
Quick pickled banana peppers are an absolute game-changer in my kitchen, and I’m so excited to share this simple recipe with you. Forget those store-bought jars that can sometimes be a bit too… well, *too* much of everything. My approach to quick pickled banana peppers delivers a vibrant, zesty kick that’s perfectly balanced. What’s not to love about that satisfying crunch and a burst of tangy, slightly sweet flavor that elevates everything from sandwiches and burgers to salads and charcuterie boards? This isn’t just a condiment; it’s a flavor enhancer, a palate cleanser, and a delightful surprise that transforms ordinary meals into something truly special. They are incredibly easy to make, allowing you to capture that fresh, bright taste in no time at all. Get ready to experience the magic of homemade quick pickled banana peppers!
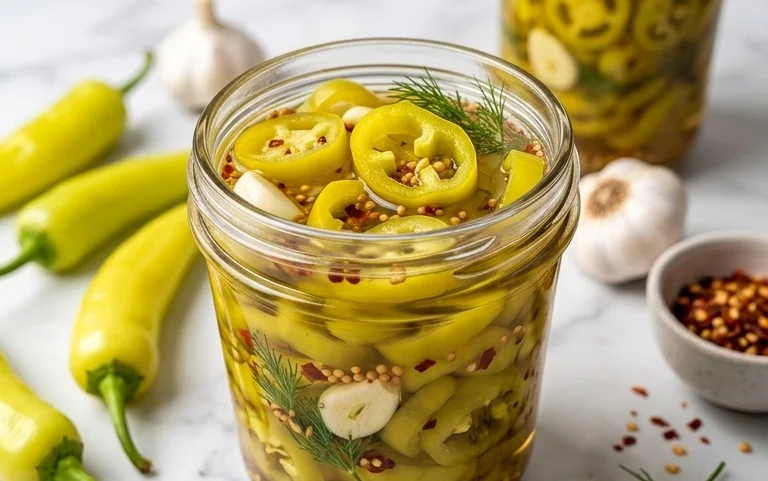
Quick Pickled Banana Peppers
There’s something incredibly satisfying about a jar of vibrant, tangy pickled peppers. They add a zesty punch to sandwiches, salads, pizzas, and even charcuterie boards. While traditional pickling can take weeks, my recipe for quick pickled banana peppers is a game-changer. In just a few hours, you’ll have delicious, briny peppers ready to elevate your meals. They’re incredibly easy to make, and the results are so rewarding. This is my go-to method when I have a surplus of banana peppers or just crave that bright, acidic kick.
Ingredients:
- 14-16 oz fresh banana peppers
- 2-3 cloves garlic (minced)
- 1.5 cups vinegar (your choice of white vinegar, grape juice vinegar, white balsamic vinegar, or apple cider vinegar)
- 1.5 cups water
- 1/2-1 tsp sea salt
Preparing the Peppers and Brine
The first step to delicious pickled peppers is, of course, preparing the star ingredient. Grab your fresh banana peppers. Give them a good rinse under cool water to remove any dirt or debris. For these quick pickles, we want to slice the peppers, not leave them whole. This allows the brine to penetrate quickly and effectively, infusing them with flavor in a short amount of time.
You have a few options for how you slice them. You can slice them into rounds, about 1/4 inch thick. This is a classic and beautiful way to present them. Alternatively, if you prefer longer strips, you can halve them lengthwise and then slice them into strips. For a less intense spice and a more manageable bite, you can also de-seed them. To do this, simply slice the pepper in half lengthwise and then use a small spoon or the tip of a knife to scrape out the seeds and membranes. I usually opt for rounds, leaving a few seeds in for a bit of extra warmth. It’s all about personal preference here!
Now, let’s talk about the brine. This is where the magic happens. In a medium saucepan, combine your vinegar, water, and sea salt. I love experimenting with different vinegars. White vinegar provides a clean, sharp tang. Grape juice vinegar offers a slightly sweeter and fruitier note. White balsamic vinegar adds a subtle complexity without the dark color of regular balsamic. And apple cider vinegar brings a delightful fruity and earthy undertone. The recipe calls for 1.5 cups of vinegar and 1.5 cups of water, creating a perfectly balanced 1:1 ratio for a robust brine. Add your sea salt – I recommend starting with 1/2 teaspoon and tasting the brine once heated. You can always add a pinch more if you prefer it saltier, but remember that the peppers will absorb some of the salt.
Simmering the Brine and Packing the Jars
Once you have your ingredients measured out, place the saucepan over medium heat. Stir the mixture gently until the salt has completely dissolved. We don’t need to bring this to a rolling boil, just heat it through to ensure the salt is incorporated. While the brine is warming, you can mince your garlic. I find that 2-3 cloves is the perfect amount to give a subtle garlicky undertone without overpowering the peppers. If you’re a big garlic fan, feel free to add an extra clove!
Now it’s time to assemble your jars. Grab a clean glass jar or two. Mason jars are ideal for this. Make sure they are thoroughly washed and sterilized, especially if you plan to store them in the refrigerator for a longer period. Carefully pack your sliced banana peppers into the clean jars. Don’t be afraid to pack them in snugly, but avoid crushing them. Distribute the minced garlic evenly between the jars as you fill them with the peppers.
The Quick Pickling Process
Once your jars are filled with peppers and garlic, it’s time to pour over the warm brine. Carefully ladle the warm vinegar and water mixture over the peppers, ensuring that they are completely submerged. You want to make sure every piece of pepper is covered by the brine. This is crucial for proper pickling and to prevent any parts of the pepper from being exposed and potentially spoiling. If you find you don’t have quite enough brine to cover them all, you can quickly whip up a small additional batch by combining 1/2 cup of vinegar and 1/2 cup of water with a pinch of salt, heating it through, and adding it to the jar.
After pouring the brine, gently tap the jars on the counter a few times. This helps to release any trapped air bubbles that might be lingering amongst the peppers. You can also use a clean chopstick or skewer to gently poke around the edges of the jar, encouraging those bubbles to rise to the surface. Once you’re satisfied that most of the air bubbles are gone, screw the lids on tightly.
Cooling and Enjoying
Now comes the waiting game, but it’s a very short one! Let the jars cool down to room temperature on your counter. This is a critical step for quick pickling. As the jars cool, the brine continues to work its magic, drawing moisture out of the peppers and infusing them with the tangy, savory liquid. Once they’ve reached room temperature, you can transfer them to the refrigerator.
And that’s it! Your quick pickled banana peppers will be ready to enjoy in as little as 2-3 hours. However, I find the flavor really develops beautifully after about 12-24 hours in the fridge. The longer they sit, the more the flavors meld and deepen. They will keep in the refrigerator for several weeks, though I doubt they’ll last that long once you start using them! These are perfect on a simple turkey sandwich, piled on top of a juicy burger, mixed into a potato salad, or simply eaten straight from the jar as a delicious, crunchy snack. Enjoy the bright, fresh flavor you’ve created!
Conclusion:
There you have it! My incredibly simple and satisfying recipe for quick pickled banana peppers. This recipe is truly a game-changer because it allows you to infuse your meals with that perfect tangy, slightly spicy kick in a fraction of the time traditional pickling takes. The beauty of these quick pickled banana peppers lies in their versatility and ease of preparation, making them accessible even for beginner cooks. They’re fantastic piled high on sandwiches, burgers, and subs, adding a vibrant contrast of flavor and texture. You can also chop them up and stir them into salads, pasta dishes, or even mix them into dips for an unexpected zing. Don’t be afraid to get creative with the brine – consider adding a pinch of red pepper flakes for extra heat, a bay leaf for a more complex herbal note, or even a touch of honey for a subtle sweetness.
I truly encourage you to give this recipe a try. It’s a rewarding way to elevate your everyday cooking with minimal effort. You’ll be amazed at how quickly you can transform ordinary ingredients into something special.
Frequently Asked Questions:
How long do these quick pickled banana peppers last?
When stored in an airtight container in the refrigerator, these quick pickled banana peppers should remain fresh and delicious for about 2 to 3 weeks. The brine helps to preserve them, but they are not shelf-stable like traditional canned pickles.
Can I use different types of peppers?
Absolutely! While this recipe is specifically for banana peppers, you can experiment with other mild, firm peppers like pepperoncini or even thinly sliced bell peppers. Adjust the pickling time slightly based on the thickness of the pepper.
What makes them “quick” pickled?
The term “quick” refers to the fact that these peppers are ready to eat within a few hours, or even after cooling. Unlike traditional pickling which can take weeks or months, this method relies on a hot brine that penetrates the peppers rapidly, allowing them to absorb the flavors much faster.
Quick Pickled Banana Peppers
A simple and fast recipe for quick-pickled banana peppers, perfect for adding a tangy kick to sandwiches, salads, or as a side.
Ingredients
-
14-16 oz fresh banana peppers
-
2-3 cloves garlic, minced
-
1.5 cups white vinegar
-
1.5 cups water
-
1/2-1 tsp sea salt
Instructions
-
Step 1
Wash the banana peppers thoroughly. Trim off the stems and slice the peppers into rings or lengthwise, removing seeds if desired for less heat. -
Step 2
In a medium saucepan, combine the vinegar, water, and sea salt. Bring the mixture to a boil over medium-high heat, stirring until the salt is dissolved. -
Step 3
While the brine heats, pack the prepared banana peppers and minced garlic into clean jars. -
Step 4
Carefully pour the hot brine over the peppers and garlic in the jars, ensuring they are fully submerged. Leave about 1/4 inch of headspace at the top. -
Step 5
Wipe the rims of the jars clean, secure the lids, and let them cool to room temperature on the counter. -
Step 6
Once cooled, transfer the jars to the refrigerator. The peppers will be ready to eat in about 24 hours, and the flavor will continue to develop over time.
Important Information
Nutrition Facts (Per Serving)
It is important to consider this information as approximate and not to use it as definitive health advice.
Allergy Information
Please check ingredients for potential allergens and consult a health professional if in doubt.